Renovation Update! After some hiccups with broken tile and lot mismatches (new lots one size and old lots smaller!) we are finally in Tile Phase I in our primary bath renovation- the shower. While I’ve laid tile in a tub/shower before, it’s been a while (back in 2000 or so) and it wasn’t nearly as complicated a design and the tile wasn’t nearly as expensive! We have both learned a lot about laying tile over the years from our favorite installers (Cain, Jack & Chris!) and I’m gaining a new appreciation for just how time consuming and labor intensive being a professional tile installer is. That being said, we are doing this renovation in our spare time, and not being professional tile installers, we’ve accepted that it won’t be to the level of perfection we have become accustomed to from our trades- especially as we are including our children in the process.
Attention to centerlines, level and plumb
We know that keeping the tile level and plumb is critical, so we attempted to set our mud-bed to achieve this as best we could with the help of our 16-year-old daughter. Our first attempt resulted in one of the three perimeter edges not being quite level, but the pan is still sloping to the drain. Two out of three isn’t bad and the grout joint won’t be too large so we decided we could live with it. So next we started laying tile accounting for the unlevel-ness but in Russell’s haste to make progress starting with a full tile in the corner he didn’t pay attention to the detailed layout I had drafted nor the small cuts against the outer sides of the niches that could be avoided by adjusting the center of the starting course just slightly. So… we had to tear out three courses of tile- roughly 3 square feet which may have been a blessing in disguise as it revealed we weren’t getting adequate coverage with the thin set. We ordered takeout that night and reset those first three courses. It turns out there is a lot more thought and planning that goes into achieving a quality tile job and laying tile than most give installers credit for.
Precision in Layout
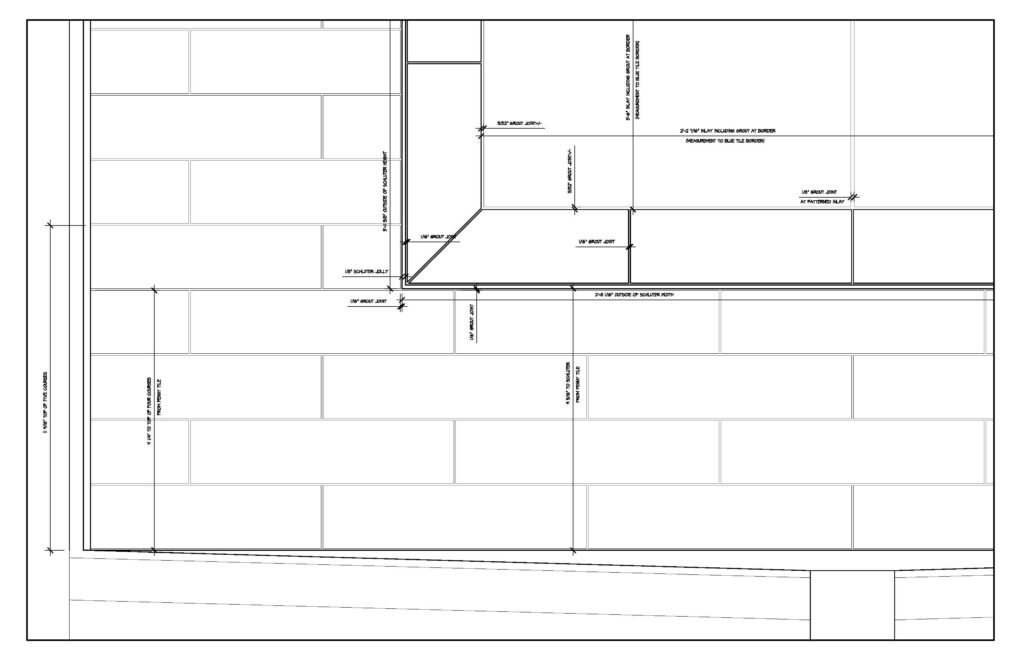
Nothing is simple when a designer is doing their own project… of course the pretty tile inlay on the back wall that uses 3 different tiles and a ⅛” Bronze Schluter inlay means that calculating the required grout joints isn’t straightforward either. Remember that different tile lot issue I mentioned above? Well that was discovered in a full dry lay of the pattern for the back wall prior to beginning any laying of the tile. The lot sizing difference of the accent tile is actually a pretty big deal- a ¼” variance in an interlocking patterned tile just doesn’t work. The tile came 9 pieces to a box, the inlay utilizes 10 pieces. We received 5 boxes from one lot and a full box to replace the ones that came in broken. (We are utilizing the same patterned tile on the floor- that’s what the other 5 boxes are for.) Had I not done a full dry lay and inadvertently revealed the sizing discrepancy we could have been “in it” laying tile only to discover a big issue and not being able to acquire just one more piece of the larger tile from the lot needed. The larger tile should course out better in the end but determining the grout joint sizing wasn’t just a matter of personal preference. (1/32” of an inch difference in joint across roughly 40 courses of tile adds up to over an inch!) We settled on the field grout joints being set at 1/16” but are allowing for adjustment in the inlay up to ⅛” and “whatever is required” at the Schluter accent. Our experience 20 years ago in our secondary bath with out of plumb walls made us pay close attention to the framing for the shower walls and niches. And getting the bullnose edge pieces set as we go should help us hold the line.
Stay tuned for the next installment in our Tile Laying Experiment!